Hello there Pinterest Fanatics!
This week I will be teaching you how to make a FABRIC KEY CHAIN!
This is a simple project that brings awesome results! :)
My inspiration comes from The Idea Room!
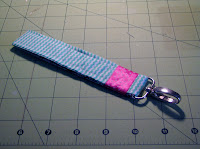
And here is my final project...
Here is what you'll need for this project...
Supplies:
2 Coordinating Fabrics
1 Strip of Fusible Interfacing
1 Purse Strap Clip
4 Inches Ribbon (7/8" width)
Matching Thread
All of these supplies can be found at Joann's...or another craft/fabric supply store! :)
First, cut your fabric so that you have a strip of each material that measures 2.75 inches by 13 inches. Also, cut a 12 inch strip of the fusible interfacing.
Now, it's time to hit the ironing board! First, iron each piece of fabric flat...in order to eliminate any random creases. Then, iron a 1/4" seam down both sides of each piece of fabric. Make sure to do this with the right-side of the fabric face down on your ironing board!
Once both fabrics have been ironed, fold the material in half lengthwise and iron again. Make sure you match the edges up nicely!
Next, take your strip of fusible interfacing and place it evenly between your two fabrics. Make sure the folds of each ironed fabric are on opposite sides. Now...iron these together! This will temporarily fuse the two materials together so they are easier to sew! It will also make your key chain a little sturdier!
Now it's time to break out the sewing machine!! Sew along both edges of the key chain with about a 1/8" seam.
Now, take your purse clip and slide onto the key chain. Be sure that the clip is on top of the material you want to be on the outside of your key chain. Place the two raw edges so that one is overlapping the other one about 1/4 of an inch...and pin. Sew the edges together using a zig-zag stitch several times back and forth. You want to make sure it does not come apart!
Move the purse clip around the key chain until the seam is about 1/4"-1/2" above the clip. Now, take the 4" strip of ribbon and wrap it around the area where the two ends have been sewn together. Tuck both ends of the ribbon to the inside of the key chain. Keeping the ribbon in place, iron. I did this in order to crease the ribbon where necessary. This makes it easier when hot gluing!
Now, just glue the ribbon in place! Make sure not to use too much glue...you don't want the excess squishing out! First, I glued the ribbon around the outside. Then, I put glue on the ends and tucked them inside the key chain...gluing each end to its respective side. Finally, I put a little more glue inside the key chain, in order to keep the ribbon part from separating.
Make sure to give the glue plenty of time to dry before using it!
The original tutorial, said to sew the ribbon, but I found it much simpler (and just as effective) to hot glue it instead!
And there you have it! You're all done! Cute, huh?!? :)
Now...it's your turn!
Until next week...
XOXO,
Brittney


No comments:
Post a Comment