Hello there Pinterest Fanatics!
Lately, I've had baby fever! My sister says I'm obsessed! Lol.
Anyway...this week I will be teaching you how to make Fabric Applique Onesies!
My inspiration comes from...Simply This and That!
And my final product...
Okay! Here's what you'll need for this project...
Supplies:
Plain White Onesies (I got a five-pack of Gerber Onesies from Target for $9.99)
Fabric, patterns of your choice
Heat N Bond Ultrahold (NO-SEW)
Various Templates
(You can use whatever templates you want, it's all up to you! I personally used some clipart I found on Etsy! After the fact, I realized I could have used my Cricut to cut out some cute animals! Oh, well!)
Iron
Scissors
First, trace your templates onto the paper side of your Heat N Bond...
I used a small piece of double-stick tape (on each template) to hold it in place while I traced it!
Now comes the most time-consuming part of this project...cutting! It'll take a little while to cut out all of your shapes because of the details...so grab your Heat N Bond and some scissors...and take a seat in front of the TV! :)
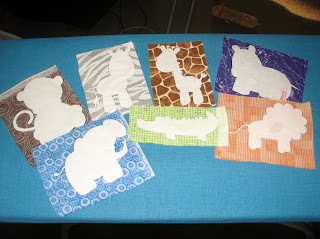
Once you have all of your pieces cut-out, it is time for step one of ironing! First, place your fabric wrong side up! Then, place your cut-out onto the fabric, paper side up! That means, the sticky/iron-on side should be touching the fabric. Now, take your iron (set on medium heat) and press the cut-out for two seconds! Continue this until the entire cut-out is adhered to the fabric. (If you decide to use a different brand/type of iron-on bonding, make sure to follow the instructions on the package)
Once my cut-out was sufficiently adhered to the fabric, I just cut a quick little square out of the fabric...in order to detach the adhered piece from the rest of the fabric (this makes things easier later). Once all of your cut-outs are adhered to their respective fabrics, it's time to do more cutting!
This time, you are cutting the templates out again! Simply cut around your iron-on in order to cut the shape out of the fabric. Once this is complete, it is time for step two of ironing!
NOW, it's time to iron the pieces onto the onesies! First, make sure to iron the onesie to get rid of any wrinkles! Now, peel off the paper part of your cut-out...and you will reveal another iron-on side! Center the cut-out on the front of the onesie...and repeat the original process. Press with iron for two seconds and continue until entire piece is adhered to the onesie.
Once I had all of the pieces adhered to the onesies, I decided I need to add some details in order to better define the animals. I used a pencil to sketch out various details (eyes, nose, mouth, etc) and then went over the pencil with a fine point sharpie.
And there you have it! Adorable one-of-a-kind onesies!
Of course, you could also use regular t-shirts...or really any kind of fabric item!
Of course, you could also use regular t-shirts...or really any kind of fabric item!
I'll probably repeat this project at some point...and use my cricut for the templates!
If I do, I'll be sure to post a picture!
Until next time...
XOXO,
Brittney


No comments:
Post a Comment