Wednesday, February 27, 2013

Week 7: Spring/Easter Yarn Wreath

Hello my fellow Pinterest Fanatics!  I hope all of you have had a great week!  I know I have!  I've been doing a lot of prep work for the craft show (my first) I will be participating in on March 16th!  I am super excited!! :)

Anyway, this week, I will be teaching you how to make a very simple yet adorable yarn wreath for Spring/Easter!  My inspiration for this wreath comes from TARGET!  We all love Target, of course...who doesn't??...and a couple of weeks ago I saw an awesome Easter wreath!  And I thought...I can make that!

So, here is my final product...


So. Cute.

Here's what you'll need for this project...


Supplies:
Foam Wreath Form
1 Skein of Spring-Colored Variegated Yarn
Hot Glue Gun & Glue Sticks
Scissors
Ribbon, etc (to decorate the wreath)


To begin, put a small dab of hot glue onto the wreath form and glue down the beginning of the yarn.  Then, just wrap!  It's really that simple!  All your'e doing is wrapping the yarn around the wreath form.  Make sure your yarn is even and not overlapping.  And I recommend putting a dab of hot glue on the wreath after every twenty wraps.  This will just ensure the yarn stays in place as you continue to wrap the wreath.


Continue wrapping the yarn all the way around the wreath, until it is fully covered.  I only did one layer of yarn, but if you'd like to you can always add one (or more) layers...it all depends on the look you're going for!

Now, it's time for the decorating!  You can decorate the wreath however you'd like!  I, personally, added a pink bow and a painted wooden flower!


I think it turned out great!  My only regret...I wish I would have used a bigger wreath form.  The sized I used seems to be a little small for a front door wreath.  Oh well.  It still looks cute!

Well, I hope you enjoyed this week's tutorial!  
If you make a wreath of your own, I'd love to see pics!

Until next week...

XOXO,
Brittney


Wednesday, February 20, 2013

Week 6: Diaper Cake

Hello my lovely Pinterest Fanatics!  Did you miss me last week?!?  I'm sorry I didn't post...I was busy preparing for a surprise baby shower! :)

One of the things I made for this baby shower was a diaper cake!  I do not have an "inspiration" this week because I learned to make these a while back.  And I absolutely LOVE them!  These cakes make a perfect gift or decoration/centerpiece for a baby shower!  They also make a great nursery decoration for after the shower!

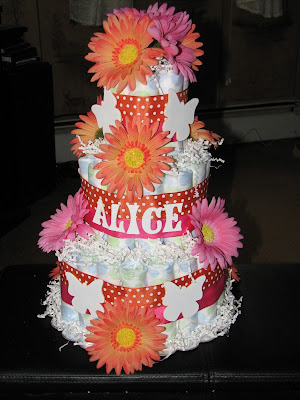
Here is my final product...
 

Now...isn't that just ADORABLE?!?

Ok.  Let's learn how to make it!

Here's what you'll need for this project...


Supplies:
14" Cake Round
Size 2 Diapers (approx 77 for a 3-tier cake)
Large Rubber Bands
Small Rubber Bands (I use small clear hair ties)
1 Paper Towel Roll and 1 Toilet Paper Roll 
(or three toilet paper rolls, if you don't use paper towels)
Scissors
Hot Glue Gun
Ribbon
Shredded Paper
Silk Flowers
Wooden Letters
Misc Decorating Supplies!

The first step is to roll all of the diapers!  This is the most tedious part of this project.  So, grab your box of diapers and set up in front of the TV! :)  You will need to roll approx 77 diapers for one 3-tier cake.


 Take the diaper and lay it in front of you, like the first picture above (with the back side facing you).  Now, open up the diaper and roll from the bottom.


Once you have rolled up the diaper, place one of your small clear rubber bands around the center of it (as shown above).

Now, continue this process until you have rolled all 77 of your size 2 diapers!


Once you are done rolling the diapers...it is time to assemble your cake!


Your 14" cake round is going to be the base of your cake, and the paper towel/toilet paper rolls will be the core structure of your cake.  Before you build the cake, you need to create the structure.  To do this, just insert the paper towel rule into the toilet paper roll.  Easy enough, right?  


Now...it's time to build!  First, put one of your large rubber bands around your structure.  Insert one diaper into the rubber band.  Make sure to line up the large rubber band with the small rubber band that is already wrapped around your diaper.  Continue to do this to complete the first layer of the first tier.  You will need seven diapers to complete this first layer.


Next, begin your second layer.  You are basically just adding another row of diapers around the first layer.  Make sure you are inserting this diapers into the original large rubber band.  You will use 13 more diapers for the second layer.


Finally, make your third layer.  You will do this the same way you completed the first two layers.  For the third layer, you will use another 19 diapers.  Therefore, your first tier will consist of a total of 39 diapers.

Now for the second tier...


You will build your second (and third tiers) the exact same way; you will use one large rubber band for each tier.  However, for your second tier you only need two layers/rows of diapers (7 for the first row and 13 for the second row; 20 total).  


And your third tier will only be one row of 7 diapers.  Now, you are finished with your basic cake!

Now, it's time for the fun part...DECORATING!  You can basically decorate your diaper cake however your little heart desires!  If you are making this for someone else, I would recommend asking them if they have a theme or color scheme for their nurser and/or shower. 

For example, my friend's two favorite colors are pink and orange...and she loves butterflies!  So, that is the "theme" I used for the diaper cake!

Like I said, you can decorate this cake however you would like, but here is how I decorated mine...


First, I added ribbon around each tier of my cake.  I did this by hot gluing the edges of two different ribbons together, to make a double-ribbon.  Then, I wrapped the double-ribbon around the cake tier and hot glued the ends together at the back of the cake.  I repeated this step for each tier.  Be very careful if you decide to use a hot glue gun!  Make sure not to get any of the hot glue on the diapers!  You want to make sure the diapers are able to be used.


Next, I added some silk flowers and paper shred.


 Finally, I added wooden letters to spell out future-baby's name...ALICE!  I also added little wooden butterflies that I found at Michael's!

I think the diaper cake turned out absolutely beautiful...


I hope you enjoyed this week's tutorial!

Stay tuned next week for another great project!

XOXO,
Brittney

Wednesday, February 6, 2013

Week 5: Copycat Lofthouse Cookies!

Hello my dear Pinterest Fanatics!!

Today, I will be teaching you how to make Copycat Lofthouse Cookies!  You know Lofthouse Cookies, right?  Probably THE best frosted sugar cookies ever!  So delicious!  If you haven't tried them...you are missing out!  

Before I start this tutorial, let me tell you...I am a terrible baker!  I don't know what it is, but I can't bake to save my life!  I always screw something up!  So...that being said...this week's project was quite a challenge for me!  BUT...if you have some counter space and a decent mixer...I'm sure you'll do just fine! :)

My inspiration comes from Sweet Pea's Kitchen!

And the result...

Not quite as pretty...but just as delicious, I'm sure! :)

Here's what you'll need...

Ingredients:

For the Cookies…
 6 cups flour
1 teaspoon baking soda
1 teaspoon baking powder
1 cup butter, room temperature
2 cups granulated sugar
3 eggs
1 teaspoon vanilla extract
1 1/2 cups light sour cream

For the Frosting…
1 cup butter, room temperature
1 teaspoon vanilla extract
4 cups powdered sugar
6 tablespoons heavy cream
Several drops food coloring
Sprinkles


First, in a medium bowl, whisk 5 cups of flour, baking soda, and baking powder; set aside.


Next, in a separate bowl, use an electric mixer to cream the butter and granulated sugar at medium speed until light and fluffy, about 3 minutes.  Make sure to scrape down the sides of the bowl with a rubber spatula as needed. 

Now, add the eggs, one at a time beating until each is thoroughly mixed. Add the vanilla and sour cream and beat at low speed until combined.

Then, add the dry ingredients and beat at low speed until combined, scraping down the bowl as needed. Dough needs to obtain the right consistency for rolling, so add additional flour, 1/4 cup at a time, until this is achieved (up to 1 cup more flour). 


Divide dough into two sections. Flatten into rectangles about 1 1/2 inches thick, then wrap with plastic wrap. Chill in the refrigerator overnight.

The next day, preheat the oven to 425 degrees F. Line 2 large baking sheets with parchment paper or spray them with nonstick cooking spray, set aside.


Generously flour a work area and rolling pin. With a rolling pin, roll the dough out to 1/4-inch thickness. Using a 2 1/2-inch round cookie cutter, cut out circles and transfer to a baking sheet. 

Bake for 7-8 minutes, until pale golden. Immediately transfer cookies to a wire rack to cool.


To make the frosting, cream together the butter and vanilla with an electric mixer. Slowly beat in the powdered sugar. Once smooth and creamy, add in heavy cream, 1 tablespoon at a time until the desired spreading consistency is achieved. If desired, add food coloring and beat until combined.


Once cookies have cooled completely, frost and add sprinkles. Allow frosting to set, then store in an air-tight container. Let cookies sit for several hours before serving to allow the flavors to develop.
 
Yields: 4 1/2 dozen cookies


ALL DONE!

See?  That wasn't too difficult! (I'm just completely incompetent when it comes to baking!)

Although these aren't quite as delicious as the real thing, they are very comparable!  Absolutely delish!
Well, thanks for reading yet another one of my Pinterest Tutorials!  
Stay tuned next week for another great project! :)

XOXO
Brittney